Ok, so in the last few articles, we focused on what the NodeMCU + Lua ecosystem could do for us; and actually, it does a great deal of stuff in a very straightforward way.
The Lua API, albeit a bit php-esque sometimes, is pretty simple to understand and to code. The Esplorer / esptool combo is not complex and can get you started on the NodeMCU in a few minutes, which is great.
But.
But after developing quite a few production-grade devices with the Lua firmware, I began to experience some frustration over the limitations of the language and the debug capabilities:
- unwanted reboots
I experienced quite a few reboots for no reason (although I think this is heap related, but well) and there is no log to tell you why it rebooted.
- memory leaks
Sometimes the heap fills up, sometimes it empties, but that's not reproducible, non deterministic, and totally random. The same code can run for two weeks with a steady heap, and then the behavior starts to be erratic. This is weird.
- ADC weird behaviour
At one point I wanted to test the basic functionality of the ADC0 pin. Turns out the result for adc.read() for a pin at GND was 23 while being a normal 1023 for a pin at 3.3V ... which is quite odd.
- memory, memory, memory
Having to compile every file each time I make a change and limit the number of function calls in my code is a hassle that is difficult to live with when writing production code
The alternative
Ok, so we have an alternative (not only one though), and it sounds promising.. the Arduino IDE now supports the ESP8266 board directly !
Thanks to the guys at the ESP8266 Community forum, it works pretty well out of the box and the installation on the Arduino IDE could not be simpler.
Installation
You just have to go in the preferences (Arduino > 1.6.5) and add a new board manager url :
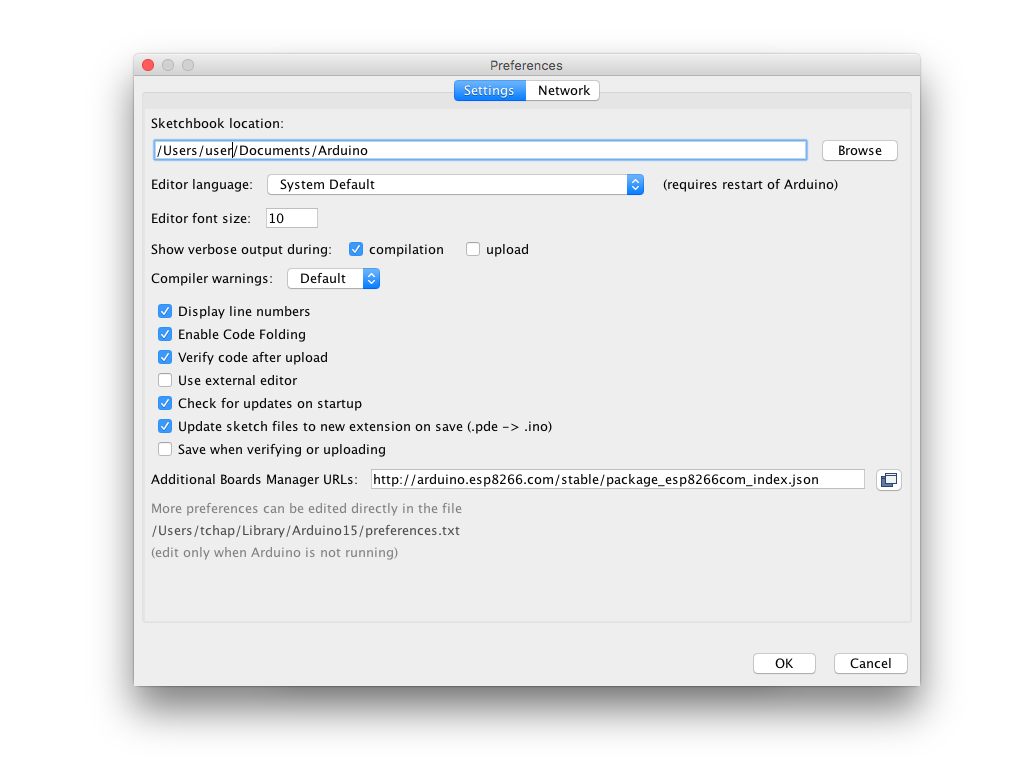
It is : http://arduino.esp8266.com/stable/package_esp8266com_index.json.
Click OK and you have your new boards ready to use :
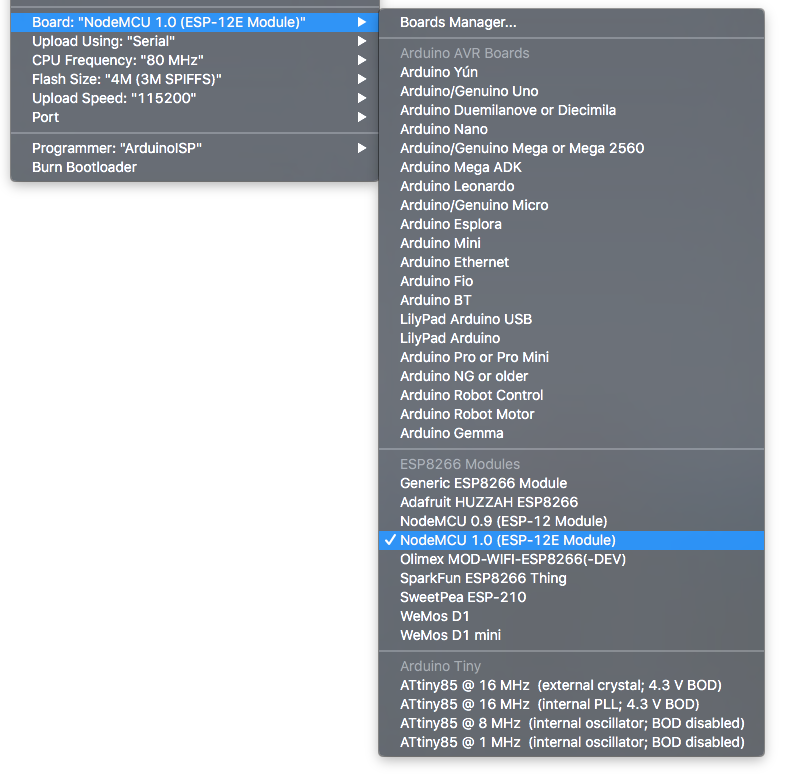
Ooooooh yeah. NodeMCU 1.0 is actually the Amica revision.
NB : you don't have to flash a specific firmware to use it with the Arduino IDE. In fact, it's the firmware that you code directly
A simple MQTT example
I will redo a very simple MQTT example here to match the functionnality of the previous tutorial I did with Lua (see http://www.foobarflies.io/a-simple-connected-object-with-nodemcu-and-mqtt/).
The NodeMCU will connect to the Wifi, then connect to a broker and send regular pings, while accepting and logging messages on a specific endpoint.
The bare minimum
Well, it's exactly like for an Arduino sketch, so it's quite straightforward if you already know the Arduino ecosystem :
void setup() {
  // put your setup code here, to run once:
}

void loop() {
  // put your main code here, to run repeatedly:
}
The libraries
Of course you'll need some libraries to make the following example. I use only one for this app : the PubSubClient from lmroy.
You can add it as easily as you would add a library for an Arduino project, I won't detail the process.
The config file
Well, we're talking C here now, so the config file is a straightforward header file config.h (for instance, you could use anything else you like) :
// Wifi credentials
const char* ssid = "MyWifiSSID";
const char* password = "MyPassword";

// MQTT Broker credentials
int mqtt_port = 1883;
const char* mqtt_device_name = "ESP8266";
const char* mqtt_server = "broker.example.com";
const char* mqtt_user = "myUser";
const char* mqtt_password = "myMQTTpassword";

const uint32_t ID = ESP.getChipId();

const char* endpoint = "nodemcu/";
char endpoint_register[20];
char endpoint_ping[20];
Here, you notice that we have a specific API for getting the ESP basic stuff. You can have a look in the source for some details on the functions available.
ESP.getChipId() is the equivalent to node.chipid() in the Lua API.
The Wifi setup
The WiFi setup is quite similar to a standard Arduino Wifi Shield code; we're setting the basics, and connecting, and looping until we have an IP:
void connect_wifi()
{
  delay(10);

  // We start by connecting to a WiFi network
  Serial.print("\nConnecting to ");
  Serial.println(ssid);

  WiFi.begin(ssid, password);

  while (WiFi.status() != WL_CONNECTED) {
    delay(500);
    Serial.print(".");
  }

  Serial.println("\nWiFi connected");
  Serial.print("IP address: ");
  Serial.println(WiFi.localIP());
}
There are a lot of variables that are not defined here for clarity (but it's in the source file, of course).
Our application code
As per the previous article, the process will be :
- Creating a callback function for when we receive a message
- Connecting to the broker
- Subscribing to the nodemcu/mynodeid endpoint to receive targeted messages
- Setting a recurring ping function that will send the node ID to nodemcu/ping so that the broker (and the application consuming the messages) will know that we're alive and well
So here we go (I included the full code):
/*
 Basic ESP8266 MQTT + Auth

 It will reconnect to the server if the connection is lost using a blocking reconnect function.
*/

#include <ESP8266WiFi.h>
#include <PubSubClient.h>

#include "config.h"

WiFiClient espClient;
PubSubClient client(espClient); // This is the MQTT object

long lastMsg = 0;
char ping_msg[20];

void connect_wifi()
{
  delay(10);

  // We start by connecting to a WiFi network
  Serial.print("\nConnecting to ");
  Serial.println(ssid);

  WiFi.begin(ssid, password);

  while (WiFi.status() != WL_CONNECTED) {
    delay(500);
    Serial.print(".");
  }

  Serial.println("\nWiFi connected");
  Serial.print("IP address: ");
  Serial.println(WiFi.localIP());
}

void callback(char* topic, byte* payload, unsigned int length)
{
  Serial.print(topic);
  Serial.print(": ");
  for (int i = 0; i < length; i++) {
    Serial.print((char)payload[i]);
  }
  Serial.println();
}

void send_ping()
{
  sprintf(ping_msg, "id=%08X", ID);
  client.publish(endpoint_ping, ping_msg);
}

void register_myself()
{
  client.subscribe(endpoint_register);
}

void reconnect()
{
  // Loop until we're reconnected
  while (!client.connected()) {
    Serial.print("Attempting MQTT connection...");
    // Attempt to connect
    if (client.connect(mqtt_device_name, mqtt_user, mqtt_password)) {
      Serial.println("connected");
      // Once connected, register ...
      register_myself();
    } else {
      Serial.print("failed, rc=");
      Serial.print(client.state());
      Serial.println(" try again in 5 seconds");
      // Wait 5 seconds before retrying
      delay(5000);
    }
  }
}

void setup() {
  Serial.begin(115200);

  // Setup Wifi
  connect_wifi();

  // Setup MQTT
  client.setServer(mqtt_server, mqtt_port);
  sprintf(endpoint_register, "nodemcu/%08X", ID);
  sprintf(endpoint_ping, "nodemcu/%s", "ping");
  // Sets the callback for MQTT messages
  client.setCallback(callback);
}

void loop()
{

  if (!client.connected()) {
    reconnect();
  }
  client.loop();

  // Send ping
  long now = millis();
  if (now - lastMsg > 1000) {
    lastMsg = now;
    send_ping();
  }
}
NB : We don't use any timer here like we did in the Lua code, just a
millis()check in the loop function;
Uploading and compiling
The compiling process is very easy : it's the same as if you had an Arduino at hand, just click "Upload" !
The last lines should look like this, as usual :
Using library ESP8266WiFi at version 1.0 in folder: ...
Using library PubSubClient at version 2.6 in folder: ...

Sketch uses 216,904 bytes (20%) of program storage space. Maximum is 1,044,464 bytes.
Global variables use 34,330 bytes (41%) of dynamic memory, leaving 47,590 bytes for local variables. Maximum is 81,920 bytes.
Any compilation error should pop up in orange before that.
Testing with a desktop MQTT client
Using MQTT-Spy like we did previously, well, it works !
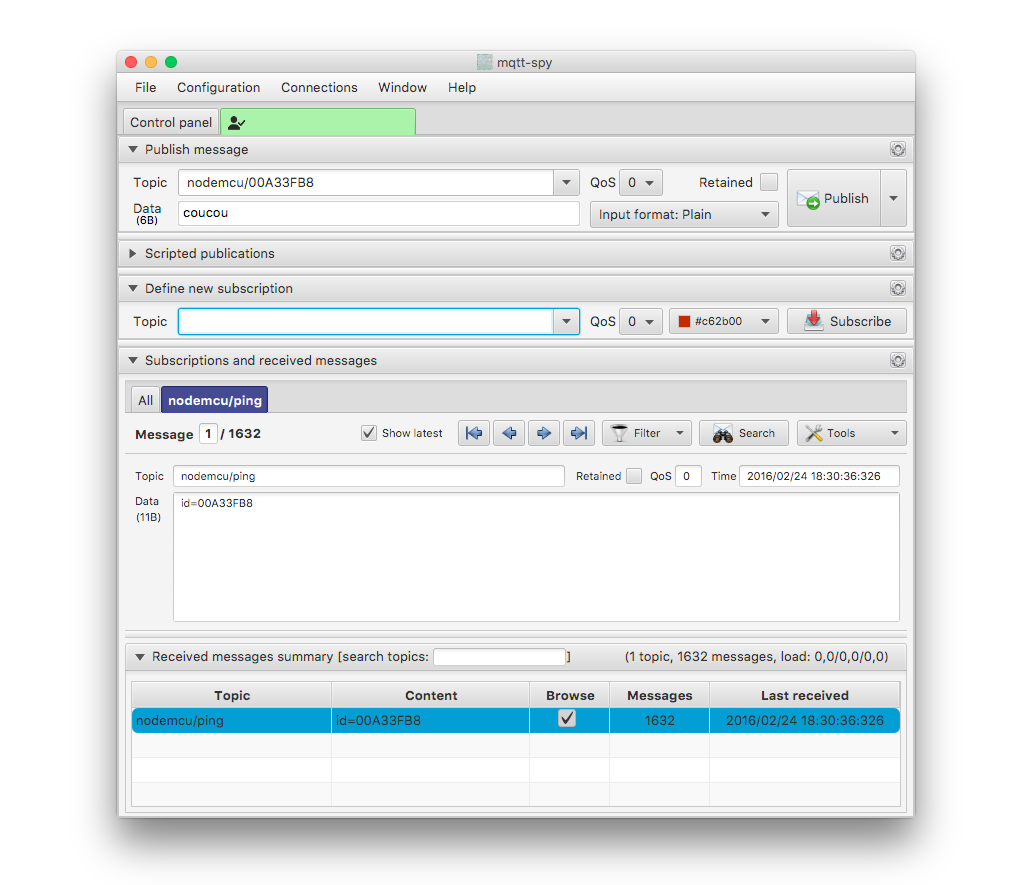
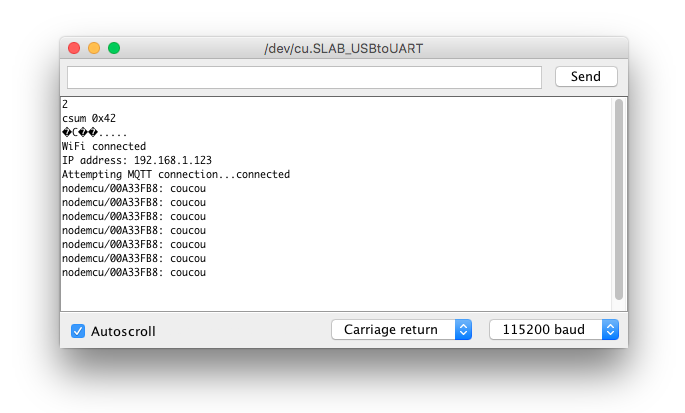
And sending coucou several times to the correct endpoint, we can open the Serial Monitor to check that everything is fine :
So now
We have the exact same functionalities as my previous example, but with a few differences :
-
We code in C. That doesn't seem like a big thing but the language is consistent and its API well-known. AND the problem with Lua is that it's excessively high level for this small chip. 4MB of C is plenty for a complex and big program, not in Lua.
-
My code is compiled, optimized and not interpreted, so it doesn't consume my heap if I put too many function calls ... Moreover, I know the amount of SRAM I'm using right when compiling, and I can tell if I got enough leeway or not.
-
There is far less erratic behaviors to report. No need to plug/unplug the device or reset it between
node.compile()or, even better, no need to reflash the firmware when the chip goes berzerk -
It just works
Final thoughts (so far)
So, I'm going to try this new workflow of development for ESP8266. I know the Espressif SDK is also there somewhere with a stable reputation, but I have a feeling the Arduino IDE and the C language is the perfect combo for this chip.
It took me literally 10 minutes to rewrite the Lua example in C, so that's not a big deal, and I plan on rewriting previous Lua bits in C quite soon to test the behavior of other libs and of the pins (ADC, 1-wire, etc ...).
In the meantime, if you have experienced the same, do not hesitate to comment this post — I know Dave from http://internetofhomethings.com/ have had approximately the same problems (see here) for example.